Friday, July 18, 2014

10 Tips to Secure Your Apache Web Server on UNIX / Linux

If you are a sysadmin, you should secure your Apache web server by following the 10 tips mentioned in this article.

1. Disable unnecessary modules

If you are planning to install apache from source, you should disable the following modules. If you do ./configure –help, you’ll see all available modules that you can disable/enable.
  • userdir – Mapping of requests to user-specific directories. i.e ~username in URL will get translated to a directory in the server
  • autoindex – Displays directory listing when no index.html file is present
  • status – Displays server stats
  • env – Clearing/setting of ENV vars
  • setenvif – Placing ENV vars on headers
  • cgi – CGI scripts
  • actions – Action triggering on requests
  • negotiation – Content negotiation
  • alias – Mapping of requests to different filesystem parts
  • include – Server Side Includes
  • filter – Smart filtering of request
  • version – Handling version information in config files using IfVersion
  • as-is – as-is filetypes
Disable all of the above modules as shown below when you do ./configure
./configure \
--enable-ssl \
--enable-so \
--disable-userdir \
--disable-autoindex \
--disable-status \
--disable-env \
--disable-setenvif \
--disable-cgi \
--disable-actions \
--disable-negotiation \
--disable-alias \
--disable-include \
--disable-filter \
--disable-version \
--disable-asis
If you enable ssl, and disable mod_setenv, you’ll get the following error.
  • Error: Syntax error on line 223 of /usr/local/apache2/conf/extra/httpd-ssl.conf: Invalid command ‘BrowserMatch’, perhaps misspelled or defined by a module not included in the server configuration
  • Solution: If you use ssl, don’t disable setenvif. Or, comment out the BrowserMatch in your httpd-ssl.conf, if you disable mod_setenvif.
After the installation, when you do httpd -l, you’ll see all installed modules.
# /usr/local/apache2/bin/httpd -l
Compiled in modules:
  core.c
  mod_authn_file.c
  mod_authn_default.c
  mod_authz_host.c
  mod_authz_groupfile.c
  mod_authz_user.c
  mod_authz_default.c
  mod_auth_basic.c
  mod_log_config.c
  mod_ssl.c
  prefork.c
  http_core.c
  mod_mime.c
  mod_dir.c
  mod_so.c
In this example, we have the following apache modules installed.
  • core.c – Apache core module
  • mod_auth* – For various authentication modules
  • mod_log_config.c – Log client request. provides additional log flexibilities.
  • mod_ssl.c – For SSL
  • prefork.c – For MPM (Multi-Processing Module) module
  • httpd_core.c – Apache core module
  • mod_mime.c – For setting document MIME types
  • mod_dir.c – For trailing slash redirect on directory paths. if you specify url/test/, it goes to url/test/index.html
  • mod_so.c – For loading modules during start or restart

2. Run Apache as separate user and group

By default, apache might run as nobody or daemon. It is good to run apache in its own non-privileged account. For example: apache.
Create apache group and user.
groupadd apache
useradd -d /usr/local/apache2/htdocs -g apache -s /bin/false apache
Modify the httpd.conf, and set User and Group appropriately.
# vi httpd.conf
User apache
Group apache
After this, if you restart apache, and do ps -ef, you’ll see that the apache is running as “apache” (Except the 1st httpd process, which will always run as root).
# ps -ef | grep -i http | awk '{print $1}'
root
apache
apache
apache
apache
apache

3. Restrict access to root directory (Use Allow and Deny)

Secure the root directory by setting the following in the httpd.conf

    Options None
    Order deny,allow
    Deny from all
In the above:
  • Options None – Set this to None, which will not enable any optional extra features.
  • Order deny,allow – This is the order in which the “Deny” and “Allow” directivites should be processed. This processes the “deny” first and “allow” next.
  • Deny from all – This denies request from everybody to the root directory. There is no Allow directive for the root directory. So, nobody can access it.

4. Set appropriate permissions for conf and bin directory

bin and conf directory should be viewed only by authorized users. It is good idea to create a group, and add all users who are allowed to view/modify the apache configuration files to this group.
Let us call this group: apacheadmin
Create the group.
groupadd apacheadmin
Allow access to bin directory for this group.
chown -R root:apacheadmin /usr/local/apache2/bin
chmod -R 770 /usr/local/apache2/bin
Allow access to conf directory for this group.
chown -R root:apacheadmin /usr/local/apache2/conf
chmod -R 770 /usr/local/apache2/conf
Add appropriate members to this group. In this example, both ramesh and john are part of apacheadmin
# vi /etc/group
apacheadmin:x:1121:ramesh,john

5. Disable Directory Browsing

If you don’t do this, users will be able to see all the files (and directories) under your root (or any sub-directory).
For example, if they go to http://{your-ip}/images/ and if you don’t have an index.html under images, they’ll see all the image files (and the sub-directories) listed in the browser (just like a ls -1 output). From here, they can click on the individual image file to view it, or click on a sub-directory to see its content.
To disable directory browsing, you can either set the value of Options directive to “None” or “-Indexes”. A – in front of the option name will remove it from the current list of options enforced for that directory.
Indexes will display a list of available files and sub-directories inside a directory in the browser (only when no index.html is present inside that folder). So, Indexes should not be allowed.

  Options None
  Order allow,deny
  Allow from all


(or)


  Options -Indexes
  Order allow,deny
  Allow from all

6. Don’t allow .htaccess

Using .htaccess file inside a specific sub-directory under the htdocs (or anywhere ouside), users can overwrite the default apache directives. On certain situations, this is not good, and should be avoided. You should disable this feature.
You should not allow users to use the .htaccess file and override apache directives. To do this, set “AllowOverride None” in the root directory.

  Options None
  AllowOverride None
  Order allow,deny
  Allow from all

7. Disable other Options

Following are the available values for Options directive:
  • Options All – All options are enabled (except MultiViews). If you don’t specify Options directive, this is the default value.
  • Options ExecCGI – Execute CGI scripts (uses mod_cgi)
  • Options FollowSymLinks – If you have symbolic links in this directory, it will be followed.
  • Options Includes – Allow server side includes (uses mod_include)
  • Options IncludesNOEXEC – Allow server side includes without the ability to execute a command or cgi.
  • Options Indexes – Disable directory listing
  • Options MultiViews - Allow content negotiated multiviews (uses mod_negotiation)
  • Options SymLinksIfOwnerMatch – Similar to FollowSymLinks. But, this will follow only when the owner is same between the link and the original directory to which it is linked.
Never specify ‘Options All’. Always specify one (or more) of the options mentioned above. You can combine multiple options in one line as shown below.
Options Includes FollowSymLinks
The + and – in front of an option value is helpful when you have nested direcotires, and would like to overwrite an option from the parent Directory directive.
In this example, for /site directory, it has both Includes and Indexes:

  Options Includes Indexes
  AllowOverride None
  Order allow,deny
  Allow from all
For /site/en directory, if you need Only Indexes from /site (And not the Includes), and if you want to FollowSymLinks only to this directory, do the following.

  Options -Includes +FollowSymLink
  AllowOverride None
  Order allow,deny
  Allow from all
  • /site will have Includes and Indexes
  • /site/en will have Indexes and FollowSymLink

8. Remove unwanted DSO modules

If you have loaded any dynamic shared object modules to the apache, they’ll be present inside the httpd.conf under “LoadModule” directive.
Please note that the statically compiled apache modules will not be listed as “LoadModule” directive.
Comment out any unwanted “LoadModules” in the httpd.conf
grep LoadModule /usr/local/apache2/conf/httpd.conf

9. Restrict access to a specific network (or ip-address)

If you want your site to be viewed only by a specific ip-address or network, do the following:
To allow a specific network to access your site, give the network address in the Allow directive.

  Options None
  AllowOverride None
  Order deny,allow
  Deny from all
  Allow from 10.10.0.0/24
To allow a specific ip-address to access your site, give the ip-address in the Allow directive.

  Options None
  AllowOverride None
  Order deny,allow
  Deny from all
  Allow from 10.10.1.21

10. Don’t display or send Apache version (Set ServerTokens)

By default, the server HTTP response header will contains apache and php version. Something similar to the following. This is harmful, as we don’t want an attacker to know about the specific version number.
Server: Apache/2.2.17 (Unix) PHP/5.3.5
To avoid this, set the ServerTokens to Prod in httpd.conf. This will display “Server: Apache” without any version information.
# vi httpd.conf
ServerTokens Prod
Following are possible ServerTokens values:
  • ServerTokens Prod displays “Server: Apache”
  • ServerTokens Major displays “Server: Apache/2″
  • ServerTokens Minor displays “Server: Apache/2.2″
  • ServerTokens Min displays “Server: Apache/2.2.17″
  • ServerTokens OS displays “Server: Apache/2.2.17 (Unix)”
  • ServerTokens Full displays “Server: Apache/2.2.17 (Unix) PHP/5.3.5″ (If you don’t specify any ServerTokens value, this is the default)
Apart from all the above 10 tips, make sure to secure your UNIX / Linux operating system. There is no point in securing your apache, if your OS is not secure. Also, always keep your apache version upto date. The latest version of the apache contains fixes for all the known security issues. Make sure to review your apache log files frequently.

Wednesday, July 9, 2014

Google public DNS will solve """yum "Couldn't resolve host 'mirrorlist.centos.org'" for CentOS 6""" Problem

yum "Couldn't resolve host 'mirrorlist.centos.org'" for CentOS 6

I ran into an issue recently where I could ping URL's just fine, but when I ran the "yum update" command yum could not resolve anything. I would get error messages like the following:
[root@viviotech ~]# yum -y update
Loaded plugins: fastestmirror
Loading mirror speeds from cached hostfile
Could not retrieve mirrorlist http://mirrorlist.centos.org/?release=6&arch=x86_64&repo=os error was
14: PYCURL ERROR 6 - "Couldn't resolve host 'mirrorlist.centos.org'"
Error: Cannot find a valid baseurl for repo: base
After a bit of digging, and absolutely no help from my friend Google, I asked one of the Vivio technicians about it and he said he'd seen it on other servers - specifically servers with VirtualMin.
Take a look at the resolve.conf file:
nameserver 127.0.0.1
nameserver 8.8.8.8
nameserver 8.8.4.4
See how VirtualMin adds the 127.0.0.1 address first? Apparently YUM will ONLY check the very first entry in the /etc/resolve.conf file when it looks for the server to resolve IP Addresses. In this case, the local DNS resolver was not configured to use forwarders, so the YUM process would ask the local DNS server where to find "mirrorlist.centos.org", and when the local resolver didn't know, YUM would simply report an error instead of looking at the other resolvers in the /etc/resolve.conf list. This is why I could ping URL's just fine, but YUM could not find them.
The solution to this was to simply place the 127.0.0.1 entry at the botton of the /etc/resolv.conf file, like so:
nameserver 8.8.8.8
nameserver 8.8.4.4
nameserver 127.0.0.1
After that, eveything worked great.
IMPORTANT: The above examples of the /etc/resolv.conf file use the IP Addresses of the Google Public DNS


CHECK THIS ALSO


I have been using several VMs for simulating a multi-node environment. Most of my VMs are CentOS.
After installing CentOS 6.4 I got the following error when I tried “yum update“:
Could not retrieve mirrorlist http://mirrorlist.centos.org/?release=6&arch=x86_64&repo=os error was
14: PYCURL ERROR 6 - "Couldn't resolve host 'mirrorlist.centos.org'"
Error: Cannot find a valid baseurl for repo: base
To fix this error I updated NM_CONTROLLED to “no” in the file /etc/sysconfig/network-scripts/ifcfg-eth0
After this I restarted the network interface using the following commands:
ifdown eth0
ifup eth0
After doing the above the yum update started working.


Saturday, April 26, 2014

Can't access Computer Management via right click

Start C:\Windows\System32\compmgmt.msc
Exit

Save batch file and exit

Type Regedit and do a search for CompMgmtLauncher.exe

Mine was located here.

[HKEY_CLASSES_ROOT\CLSID\{20D04FE0-3AEA-1069-A2D8-08002B30309D}\shell\Manage\command]

Under this key you will find a line that ends in CompMgmtLauncher.exe

Change the exe to bat and Manage should now work.

I know it is not the best fix in the world but it gets your right-click manage back up and running fast.

SOLUTION 2:

In the Command below

[HKEY_CLASSES_ROOT\CLSID\{20D04FE0-3AEA-1069-A2D8-08002B30309D}\shell\Manage\command]

Put: "%SystemRoot%\system32\mmc.exe" "%SystemRoot%\system32\compmgmt.msc" /s

Computer Management Console will work fine.


Friday, March 28, 2014

Clear search box history in Windows

There are a couple different ways to do this.

Method 1. If you are looking to just delete a few of the search terms in your history.

From your recently searched history box, highlight the term you would like to delete by hovering your mouse over it. Once highlighted, hit the delete key on your keyboard. Poof its gone! But this can be time consuming.
Image

Method 2. If you want to delete all of your search terms from your history box

Go to the start menu and open up regedit, then browse to 
CODE: SELECT ALL
HKEY_CURRENT_USER\Software\Microsoft\Windows\CurrentVersion\Explorer\WordWheelQuery

From there right-click the WordwheelQuery folder and delete it. All Gone! Now you have a clean slate.
Image


How to enable/disable/clear Windows 7 Explorer search history


If you're tired of Windows storing your previous file searches and then manually having to hover over each and press the delete key or maybe you just like a bit of privacy, this tip is for you.


To permanently disable Windows Explorer search history - (.reg)
Code:
Windows Registry Editor Version 5.00

[HKEY_CURRENT_USER\Software\Policies\Microsoft\Windows\Explorer]
"DisableSearchBoxSuggestions"=dword:00000001
To re-enable Windows Explorer search history - (.reg)
Code:
Windows Registry Editor Version 5.00

[HKEY_CURRENT_USER\Software\Policies\Microsoft\Windows\Explorer]
"DisableSearchBoxSuggestions"=-
To clear Windows Explorer search history - (.reg)
Code:
Windows Registry Editor Version 5.00

[-HKEY_CURRENT_USER\Software\Microsoft\Windows\CurrentVersion\Explorer\WordWheelQuery]
If like me you have CCleaner and want that to clean it for you, just save the following as winapp2.ini and place it next to the CCleaner executable.
Code:
[Search History]
LangSecRef=3002
Default=True
RegKey1=HKCU\Software\Microsoft\Windows\CurrentVersion\Explorer\WordWheelQuery

Thursday, February 20, 2014

Recovering unallocated space of a USB flash drive.

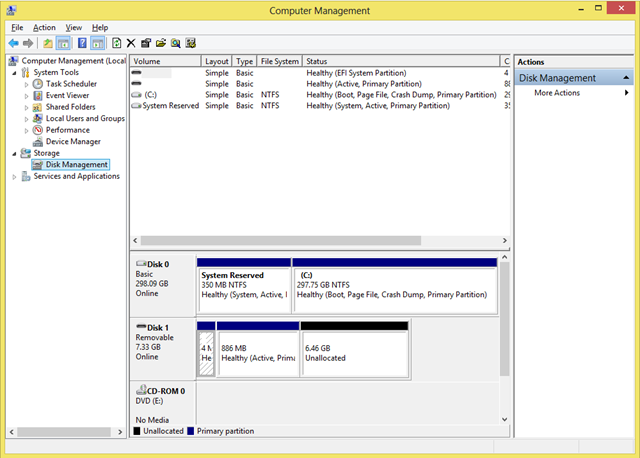
Today I played with the latest SUSE Linux Live. I had not have a DVD drive and used USB flash drive instead. I wanted to reformat my flash drive, but suddenly found it that it had not been possible. The most of the disk space had been unallocated, and my Windows 8 did not allow me to use it.
Unallocated
Unfortunately Windows does not support Fdisk anymore. But there is another good command line tool to solve this problem. The tool’s name isDiskPart. I would say it is the next generation of Fdisk tool. DiskPart provides you information about your partitions and volumes, allows you to delete and create partitions, extend NTFS volumes, etc.
Let’s remove unallocated space. First of all run Windows command line and type diskpart in the command prompt. Windows will ask you for Administrator permissions to run the tool. Then run list disk command to find your USB flash disk’s number. It should be the same as disk’s number in Computer Management tool. It was 1 in my case. Next you should chose the disk to work with. Type select disk  command, e.g.select disk 1. The next step is to clean all volumes and partitions on the disk. Use clean command to do that. The last step is to create a primary partition. You can do that using create partition primary command. That’s all. You should be able to format your flash disk now.
This is how I removed unallocated space on my machine:
Microsoft DiskPart version 6.2.9200
Copyright (C) 1999-2012 Microsoft Corporation.
On computer: COMPUTER
DISKPART> list disk
  Disk ###  Status         Size     Free     Dyn  Gpt
  --------  -------------  -------  -------  ---  ---
  Disk 0    Online          298 GB      0 B
  Disk 1    Online         7509 MB  6619 MB
DISKPART> select disk 1
Disk 1 is now the selected disk.
DISKPART> clean
DiskPart succeeded in cleaning the disk.
DISKPART> create partition primary
DiskPart succeeded in creating the specified partition.
DISKPART> exit

Saturday, February 8, 2014

If ping, Ipconfig wont work...


Before you start changing your path variables check that ipconfig.exe is in the C:windows/system32 folder and that it works. If it works ok from there then it is your path variables that are incorrect. To edit the path variables right click ‘My Computer’ select Properties, select the advanced tab, select the ‘Environmental Variables’ button.
Under the system variables box you should have the setting “PATH” which should contain the following variable value ‘%SystemRoot%\system32;%SystemRoot%’ 

It will also contain other variables depending on which programs you have installed. You should also have the setting “PATHEXT” which should contain .COM;.EXE;.BAT;.CMD;.VBS;.VBE;.JS;.JSE;.WSF;.WSH;.PSC1
You should also check that the setting “windir” is set to your Windows directory. 

Saturday, February 1, 2014

Securing wordpress directories and sub directories using .htaccess file

On computer filesystems, files and directories have a set of permissions assigned to them that specify who can Read, Write, or eXecute each file.
This permissions system is one of the basic concepts that provide security for your web site. A default WordPress installation comes with permissions settings for its files and folders (i.e. directories) that can be regarded as very secure, utilizing your servers already present permission/umask setting determine the most secure permissions that still allow access.
However, in some cases there can be a trade-off between security and functionality: Some wordpress plugins require more lenient security settings for directories they read from or write to in order to work properly.

An Example

There are plugins that provide uploading, editing and managing image files for WordPress. It writes to and reads from a base image directory which can be set up in the plugin's options panel. This directory needs to be writeable by the process running the php/server (chmod 777) in order to work properly on some server installations. However, any directory whose permissions have been set to '777' present a (real) security hole: a malicious visitor could upload a script to that directory and hack your site.
NOTE: From a security standpoint, even a small amount of protection is preferable to a world-writeable directory. Start with low permissive settings like 744, working your way up until it works. Only use 777 if necessary, and hopefully only for a temporary amount of time.

What is suEXEC

The suEXEC feature provides Apache users the ability to run CGI and SSI programs under user IDs different from the user ID of the calling web server. Normally, when a CGI or SSI program executes, it runs as the same user who is running the web server.
Used properly, this feature can reduce considerably the security risks involved with allowing users to develop and run private CGI or SSI programs. However, if suEXEC is improperly configured, it can cause any number of problems and possibly create new holes in your computer's security. If you aren't familiar with managing setuid root programs and the security issues they present, we highly recommend that you not consider using suEXEC.

The Question

How can you secure your WordPress installation while still enjoying the extended functionality that WordPress plugins provide?

Securing individual directories with .htaccess

One possible solution for this problem is provided by .htaccess. You can add a .htaccess file to any directory that requires lenient permissions settings (such as 760, 766, 775 or 777). You can prevent the execution of scripts inside the directory and all its sub-directories. You can also prevent any files other than those of a certain type to be written to it.

Securing Specific Filetypes

The following snippet of code prevents any files other than .jpeg, .jpg, .png. or .gif to be served from the directory:

   order deny,allow
   deny from all

This example uses the FilesMatch directive to specifically allow these types of files to be accessed. Change Allow to Deny and it denies all access.

Allow from All

Prevent Script Execution

The following code helps prevent executable scripts like .pl, .cgi or .php scripts from being executed when requested by a browser. This instructs the Web Server to treat them as text files instead of executables. The result is they will be displayed as plain text inside the browser window:
AddType text/plain .pl .cgi .php
The Options -ExecCGI directive is one of the more powerful directives allowed in .htaccess files. This directive controls what is allowed in .htaccess files by all the other Apache modules. The -ExecCGI specifies that NO files that are registered to be handled by the cgi-script handler are allowed. The AddHandler directive on the next line registers all those file extensions as cgi-scripts, thus making any attempts to access them results in a 403 Forbidden - Access is Denied message.
Options -ExecCGI
AddHandler cgi-script .php .pl .py .jsp .asp .htm .shtml .sh .cgi
Finally, you can use one more directive to force the type of the document, which is different than a handler. This directive removes all handlers and actions normally associated with these extensions and forces them to be used as text/plain, but it does not override the previous example in scope.

ForceType text/plain

Control Based on Remote vs Local Requests

When REDIRECT_STATUS Environment Variable

By using the AddHandler and Action directives below, we configure Apache to set the REDIRECT_STATUS environment variable. The reason is when a request is made for a file ending in .php Apache doesn't just serve the file, instead it serves the file to the/cgi-bin/php.cgi script, which can either be a real php-cgi interpreter, or it could just be a shell script that executes your real php interpreter.
AddHandler php-cgi .php
Action php-cgi /cgi-bin/php.cgi
This sets an environment variable PHPRC, then executes the php.cgi file.
#!/bin/sh
export PHP_FCGI_CHILDREN=3
export PHPRC=/home/custom-ini
exec /home/bin/php.cgi
This example just executes the php interpreter (if found) located in the current path of the executing script owner
#!/bin/sh
exec php
We can use this information to lock down htaccess directories, files, and even requests with this one simple variable. That is possible because the REDIRECT_ cgi environment variables are only set for local requests. Remember, it is Apache that is requesting the /cgi-bin/php.cgi file, so that is defined as a local request. If someone requests a webpage that ends in .php, the REDIRECT_ variable is only set for Apache when it transfers control over to the /cgi-bin/php.cgi file, therefore, you can block ALL requests to the /cgi-bin/php.cgi file that do not have the REDIRECT_STATUS variable set.

REDIRECT_STATUS

This variable is created from an internal request, and was created originally (its much older than even php, its from CGI) to be used to process ErrorDocuments. An ErrorDocument like a 404 page' is triggered by a user caused action like requesting a non-existant page, but then it is Apache that redirects the request to the ErrorDocument, just like it redirected requests for .php files above. This feature enables ErrorDocuments to be aware of the environment settings and variables from the request that caused the error. REDIRECT_STATUS is just one of the many REDIRECT_ variables that is created, basically all safe variables get passed to the redirected script prefixed with REDIRECT_.

Using Access Control

Since we now know that we only want requests that have the REDIRECT_STATUS environment variable set, we can issue a 403 Forbidden to anything else. You can place this in your /cgi-bin/.htaccess file.
Order Deny,Allow
Deny from All
Allow from env=REDIRECT_STATUS
Combined Access and with FilesMatch
This can go in your /.htaccess file and uses regex to apply to php[0-9].(ini|cgi)

Order Deny,Allow
Deny from All
Allow from env=REDIRECT_STATUS

Only Deny REDIRECT_STATUS Not 200
You may also use mod_rewrite's power to further tighten the access by only allowing for redirects with a 200 Status code. This could come into play if your default ErrorDocuments are themselves php scripts. An
ErrorDocument 403 /error.php
will have a REDIRECT_STATUS itself of 403.
Denying Requests with mod_rewrite
RewriteEngine On
RewriteCond %{ENV:REDIRECT_STATUS} !=200
RewriteRule /cgi-bin/path/to/php - [F]

See Also

External Links

Relevant Forum Threads