Thursday, February 20, 2014

Recovering unallocated space of a USB flash drive.

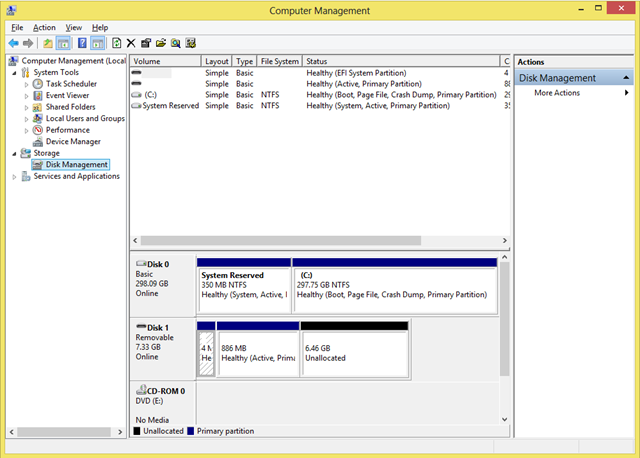
Today I played with the latest SUSE Linux Live. I had not have a DVD drive and used USB flash drive instead. I wanted to reformat my flash drive, but suddenly found it that it had not been possible. The most of the disk space had been unallocated, and my Windows 8 did not allow me to use it.
Unallocated
Unfortunately Windows does not support Fdisk anymore. But there is another good command line tool to solve this problem. The tool’s name isDiskPart. I would say it is the next generation of Fdisk tool. DiskPart provides you information about your partitions and volumes, allows you to delete and create partitions, extend NTFS volumes, etc.
Let’s remove unallocated space. First of all run Windows command line and type diskpart in the command prompt. Windows will ask you for Administrator permissions to run the tool. Then run list disk command to find your USB flash disk’s number. It should be the same as disk’s number in Computer Management tool. It was 1 in my case. Next you should chose the disk to work with. Type select disk  command, e.g.select disk 1. The next step is to clean all volumes and partitions on the disk. Use clean command to do that. The last step is to create a primary partition. You can do that using create partition primary command. That’s all. You should be able to format your flash disk now.
This is how I removed unallocated space on my machine:
Microsoft DiskPart version 6.2.9200
Copyright (C) 1999-2012 Microsoft Corporation.
On computer: COMPUTER
DISKPART> list disk
  Disk ###  Status         Size     Free     Dyn  Gpt
  --------  -------------  -------  -------  ---  ---
  Disk 0    Online          298 GB      0 B
  Disk 1    Online         7509 MB  6619 MB
DISKPART> select disk 1
Disk 1 is now the selected disk.
DISKPART> clean
DiskPart succeeded in cleaning the disk.
DISKPART> create partition primary
DiskPart succeeded in creating the specified partition.
DISKPART> exit

Saturday, February 8, 2014

If ping, Ipconfig wont work...


Before you start changing your path variables check that ipconfig.exe is in the C:windows/system32 folder and that it works. If it works ok from there then it is your path variables that are incorrect. To edit the path variables right click ‘My Computer’ select Properties, select the advanced tab, select the ‘Environmental Variables’ button.
Under the system variables box you should have the setting “PATH” which should contain the following variable value ‘%SystemRoot%\system32;%SystemRoot%’ 

It will also contain other variables depending on which programs you have installed. You should also have the setting “PATHEXT” which should contain .COM;.EXE;.BAT;.CMD;.VBS;.VBE;.JS;.JSE;.WSF;.WSH;.PSC1
You should also check that the setting “windir” is set to your Windows directory. 

Saturday, February 1, 2014

Securing wordpress directories and sub directories using .htaccess file

On computer filesystems, files and directories have a set of permissions assigned to them that specify who can Read, Write, or eXecute each file.
This permissions system is one of the basic concepts that provide security for your web site. A default WordPress installation comes with permissions settings for its files and folders (i.e. directories) that can be regarded as very secure, utilizing your servers already present permission/umask setting determine the most secure permissions that still allow access.
However, in some cases there can be a trade-off between security and functionality: Some wordpress plugins require more lenient security settings for directories they read from or write to in order to work properly.

An Example

There are plugins that provide uploading, editing and managing image files for WordPress. It writes to and reads from a base image directory which can be set up in the plugin's options panel. This directory needs to be writeable by the process running the php/server (chmod 777) in order to work properly on some server installations. However, any directory whose permissions have been set to '777' present a (real) security hole: a malicious visitor could upload a script to that directory and hack your site.
NOTE: From a security standpoint, even a small amount of protection is preferable to a world-writeable directory. Start with low permissive settings like 744, working your way up until it works. Only use 777 if necessary, and hopefully only for a temporary amount of time.

What is suEXEC

The suEXEC feature provides Apache users the ability to run CGI and SSI programs under user IDs different from the user ID of the calling web server. Normally, when a CGI or SSI program executes, it runs as the same user who is running the web server.
Used properly, this feature can reduce considerably the security risks involved with allowing users to develop and run private CGI or SSI programs. However, if suEXEC is improperly configured, it can cause any number of problems and possibly create new holes in your computer's security. If you aren't familiar with managing setuid root programs and the security issues they present, we highly recommend that you not consider using suEXEC.

The Question

How can you secure your WordPress installation while still enjoying the extended functionality that WordPress plugins provide?

Securing individual directories with .htaccess

One possible solution for this problem is provided by .htaccess. You can add a .htaccess file to any directory that requires lenient permissions settings (such as 760, 766, 775 or 777). You can prevent the execution of scripts inside the directory and all its sub-directories. You can also prevent any files other than those of a certain type to be written to it.

Securing Specific Filetypes

The following snippet of code prevents any files other than .jpeg, .jpg, .png. or .gif to be served from the directory:

   order deny,allow
   deny from all

This example uses the FilesMatch directive to specifically allow these types of files to be accessed. Change Allow to Deny and it denies all access.

Allow from All

Prevent Script Execution

The following code helps prevent executable scripts like .pl, .cgi or .php scripts from being executed when requested by a browser. This instructs the Web Server to treat them as text files instead of executables. The result is they will be displayed as plain text inside the browser window:
AddType text/plain .pl .cgi .php
The Options -ExecCGI directive is one of the more powerful directives allowed in .htaccess files. This directive controls what is allowed in .htaccess files by all the other Apache modules. The -ExecCGI specifies that NO files that are registered to be handled by the cgi-script handler are allowed. The AddHandler directive on the next line registers all those file extensions as cgi-scripts, thus making any attempts to access them results in a 403 Forbidden - Access is Denied message.
Options -ExecCGI
AddHandler cgi-script .php .pl .py .jsp .asp .htm .shtml .sh .cgi
Finally, you can use one more directive to force the type of the document, which is different than a handler. This directive removes all handlers and actions normally associated with these extensions and forces them to be used as text/plain, but it does not override the previous example in scope.

ForceType text/plain

Control Based on Remote vs Local Requests

When REDIRECT_STATUS Environment Variable

By using the AddHandler and Action directives below, we configure Apache to set the REDIRECT_STATUS environment variable. The reason is when a request is made for a file ending in .php Apache doesn't just serve the file, instead it serves the file to the/cgi-bin/php.cgi script, which can either be a real php-cgi interpreter, or it could just be a shell script that executes your real php interpreter.
AddHandler php-cgi .php
Action php-cgi /cgi-bin/php.cgi
This sets an environment variable PHPRC, then executes the php.cgi file.
#!/bin/sh
export PHP_FCGI_CHILDREN=3
export PHPRC=/home/custom-ini
exec /home/bin/php.cgi
This example just executes the php interpreter (if found) located in the current path of the executing script owner
#!/bin/sh
exec php
We can use this information to lock down htaccess directories, files, and even requests with this one simple variable. That is possible because the REDIRECT_ cgi environment variables are only set for local requests. Remember, it is Apache that is requesting the /cgi-bin/php.cgi file, so that is defined as a local request. If someone requests a webpage that ends in .php, the REDIRECT_ variable is only set for Apache when it transfers control over to the /cgi-bin/php.cgi file, therefore, you can block ALL requests to the /cgi-bin/php.cgi file that do not have the REDIRECT_STATUS variable set.

REDIRECT_STATUS

This variable is created from an internal request, and was created originally (its much older than even php, its from CGI) to be used to process ErrorDocuments. An ErrorDocument like a 404 page' is triggered by a user caused action like requesting a non-existant page, but then it is Apache that redirects the request to the ErrorDocument, just like it redirected requests for .php files above. This feature enables ErrorDocuments to be aware of the environment settings and variables from the request that caused the error. REDIRECT_STATUS is just one of the many REDIRECT_ variables that is created, basically all safe variables get passed to the redirected script prefixed with REDIRECT_.

Using Access Control

Since we now know that we only want requests that have the REDIRECT_STATUS environment variable set, we can issue a 403 Forbidden to anything else. You can place this in your /cgi-bin/.htaccess file.
Order Deny,Allow
Deny from All
Allow from env=REDIRECT_STATUS
Combined Access and with FilesMatch
This can go in your /.htaccess file and uses regex to apply to php[0-9].(ini|cgi)

Order Deny,Allow
Deny from All
Allow from env=REDIRECT_STATUS

Only Deny REDIRECT_STATUS Not 200
You may also use mod_rewrite's power to further tighten the access by only allowing for redirects with a 200 Status code. This could come into play if your default ErrorDocuments are themselves php scripts. An
ErrorDocument 403 /error.php
will have a REDIRECT_STATUS itself of 403.
Denying Requests with mod_rewrite
RewriteEngine On
RewriteCond %{ENV:REDIRECT_STATUS} !=200
RewriteRule /cgi-bin/path/to/php - [F]

See Also

External Links

Relevant Forum Threads


Sunday, July 7, 2013

Booting into a Graphical Environment

Booting into a Graphical Environment

If you have installed the X Window System but are not seeing a graphical desktop environment once you log into your Red Hat Enterprise Linux system, you can start the X Window System graphical interface using the command startx.
Once you enter this command and press Enter, the graphical desktop environment is displayed.
Note, however, that this is just a one-time fix and does not change the log in process for future log ins.
To set up your system so that you can log in at a graphical login screen, you must edit one file, /etc/inittab, by changing just one number in the runlevel section. When you are finished, reboot the computer. The next time you log in, you are presented with a graphical login prompt.
Open a shell prompt. If you are in your user account, become root by typing the su command.
Now, type gedit /etc/inittab to edit the file with gedit. The file /etc/inittab opens. Within the first screen, a section of the file which looks like the following appears:
# Default runlevel. The runlevels used by RHS are: 
#   0 - halt (Do NOT set initdefault to this) 
#   1 - Single user mode 
#   2 - Multiuser, without NFS (The same as 3, if you do not have networking) 
#   3 - Full multiuser mode 
#   4 - unused 
#   5 - X11 
#   6 - reboot (Do NOT set initdefault to this) 
#  id:3:initdefault:
To change from a console to a graphical login, you should change the number in the line id:3:initdefault: from a 3 to a 5.

Warning

Change only the number of the default runlevel from 3 to 5.
Your changed line should look like the following:
  id:5:initdefault: 
When you are satisfied with your change, save and exit the file using the Ctrl-Q keys. A window appears and asks if you would like to save the changes. Click Save.
The next time you log in after rebooting your system, you are presented with a graphical login prompt.

Sunday, June 23, 2013

Installing Apache2 With PHP5 And MySQL Support On CentOS 6.1 (LAMP)

LAMP is short for Linux, Apache, MySQL, PHP. This tutorial shows how you can install an Apache2 webserver on a CentOS 6.1 server with PHP5 support (mod_php) and MySQL support.
I do not issue any guarantee that this will work for you!

1 Preliminary Note

In this tutorial I use the hostname server1.example.com with the IP address 192.168.0.100. These settings might differ for you, so you have to replace them where appropriate.

2 Installing MySQL 5

To install MySQL, we do this:
yum install mysql mysql-server
Then we create the system startup links for MySQL (so that MySQL starts automatically whenever the system boots) and start the MySQL server:
chkconfig --levels 235 mysqld on
/etc/init.d/mysqld start
Set passwords for the MySQL root account:
mysql_secure_installation
[root@server1 ~]# mysql_secure_installation


NOTE: RUNNING ALL PARTS OF THIS SCRIPT IS RECOMMENDED FOR ALL MySQL
      SERVERS IN PRODUCTION USE!  PLEASE READ EACH STEP CAREFULLY!


In order to log into MySQL to secure it, we'll need the current
password for the root user.  If you've just installed MySQL, and
you haven't set the root password yet, the password will be blank,
so you should just press enter here.

Enter current password for root (enter for none):
OK, successfully used password, moving on...

Setting the root password ensures that nobody can log into the MySQL
root user without the proper authorisation.

Set root password? [Y/n]
 <-- nbsp="" span="">
New password: <-- nbsp="" span="" yourrootsqlpassword="">
Re-enter new password: <-- nbsp="" span="" yourrootsqlpassword="">
Password updated successfully!
Reloading privilege tables..
 ... Success!


By default, a MySQL installation has an anonymous user, allowing anyone
to log into MySQL without having to have a user account created for
them.  This is intended only for testing, and to make the installation
go a bit smoother.  You should remove them before moving into a
production environment.

Remove anonymous users? [Y/n]
 <-- nbsp="" span="">
 ... Success!

Normally, root should only be allowed to connect from 'localhost'.  This
ensures that someone cannot guess at the root password from the network.

Disallow root login remotely? [Y/n]
 <-- nbsp="" span="">
 ... Success!

By default, MySQL comes with a database named 'test' that anyone can
access.  This is also intended only for testing, and should be removed
before moving into a production environment.

Remove test database and access to it? [Y/n]
 <-- nbsp="" span="">
 - Dropping test database...
 ... Success!
 - Removing privileges on test database...
 ... Success!

Reloading the privilege tables will ensure that all changes made so far
will take effect immediately.

Reload privilege tables now? [Y/n]
 <-- nbsp="" span="">
 ... Success!

Cleaning up...


All done!  If you've completed all of the above steps, your MySQL
installation should now be secure.

Thanks for using MySQL!


[root@server1 ~]#


3 Installing Apache2

Apache2 is available as a CentOS package, therefore we can install it like this:
yum install httpd
Now configure your system to start Apache at boot time...
chkconfig --levels 235 httpd on
... and start Apache:
/etc/init.d/httpd start
Now direct your browser to http://192.168.0.100, and you should see the Apache2 placeholder page:

Apache's default document root is /var/www/html on CentOS, and the configuration file is /etc/httpd/conf/httpd.conf. Additional configurations are stored in the /etc/httpd/conf.d/ directory.

4 Installing PHP5

We can install PHP5 and the Apache PHP5 module as follows:
yum install php
We must restart Apache afterwards:
/etc/init.d/httpd restart
 

5 Testing PHP5 / Getting Details About Your PHP5 Installation

The document root of the default web site is /var/www/html. We will now create a small PHP file (info.php) in that directory and call it in a browser. The file will display lots of useful details about our PHP installation, such as the installed PHP version.
vi /var/www/html/info.php

Now we call that file in a browser (e.g. http://192.168.0.100/info.php):

As you see, PHP5 is working, and it's working through the Apache 2.0 Handler, as shown in the Server API line. If you scroll further down, you will see all modules that are already enabled in PHP5. MySQL is not listed there which means we don't have MySQL support in PHP5 yet.

6 Getting MySQL Support In PHP5

To get MySQL support in PHP, we can install the php-mysql package. It's a good idea to install some other PHP5 modules as well as you might need them for your applications. You can search for available PHP5 modules like this:
yum search php
Pick the ones you need and install them like this:
yum install php-mysql php-gd php-imap php-ldap php-mbstring php-odbc php-pear php-xml php-xmlrpc
Now restart Apache2:
/etc/init.d/httpd restart
Now reload http://192.168.0.100/info.php in your browser and scroll down to the modules section again. You should now find lots of new modules there, including the MySQL module:


7 phpMyAdmin

phpMyAdmin is a web interface through which you can manage your MySQL databases.
First we enable the RPMforge repository on our CentOS system as phpMyAdmin is not available in the official CentOS 6.1 repositories:
Import the RPMforge GPG key:
rpm --import http://dag.wieers.com/rpm/packages/RPM-GPG-KEY.dag.txt
On x86_64 systems:
yum install http://pkgs.repoforge.org/rpmforge-release/rpmforge-release-0.5.2-2.el6.rf.x86_64.rpm
On i386 systems:
yum install http://pkgs.repoforge.org/rpmforge-release/rpmforge-release-0.5.2-2.el6.rf.i686.rpm
phpMyAdmin can now be installed as follows:
yum install phpmyadmin
Now we configure phpMyAdmin. We change the Apache configuration so that phpMyAdmin allows connections not just from localhost (by commenting out the stanza):
vi /etc/httpd/conf.d/phpmyadmin.conf
#
#  Web application to manage MySQL
#

#
#  Order Deny,Allow
#  Deny from all
#  Allow from 127.0.0.1
#

Alias /phpmyadmin /usr/share/phpmyadmin
Alias /phpMyAdmin /usr/share/phpmyadmin
Alias /mysqladmin /usr/share/phpmyadmin
Next we change the authentication in phpMyAdmin from cookie to http:
vi /usr/share/phpmyadmin/config.inc.php
[...]
/* Authentication type */
$cfg['Servers'][$i]['auth_type'] = 'http';
[...]
Restart Apache:
/etc/init.d/httpd restart
Afterwards, you can access phpMyAdmin under http://192.168.0.100/phpmyadmin/:


8 Links

php.ini settings

PHP

PHP is a widely-used general-purpose scripting language that is especially suited for Web development and can be embedded into HTML.  For more information on PHP, visit their website at www.php.net.

Version

This documentation was written for PHP 5.1.6 but may be usefull with other versions.

How to install PHP

  1. Run the yum install command
    yum install php

How to configure PHP

  1. Increase PHP script memory limit
    In the /etc/php.ini file replace memory_limit = 16M with memory_limit = 128M
  2. Increase PHP script max execution time
    In the /etc/php.ini file replace max_execution_time = 30 with max_execution_time = 120
  3. Increase PHP script max upload size
    In the /etc/php.ini file replace max_upload_size = 2M with max_upload_size = 50M
    In the /etc/php.ini file replace post_max_size = 8M with post_max_size = 50M
  4. Create the /usr/share/phpinfo folder
    mkdir /usr/share/phpinfo
  5. Create the /usr/share/phpinfo/index.php file with the following text:
      phpinfo();
    ?>
  6. Change permissions on the index.php file
    chmod 0755 /usr/share/phpinfo/index.php
  7. Create the /etc/httpd/conf.d/phpinfo.conf file with the following text:
    # phpinfo - PHP utility function for displaying php configuration
    #
    # Allows only localhost by default

    Alias /phpinfo /usr/share/phpinfo

       order deny,allow
       deny from all
       allow from 127.0.0.1
  8. Restart Apache Server
    service httpd restart

Test

Visit localhost/phpinfo in your web browser. You should see the infamous phpinfo output. If the address bar changes to somthing other than http://localhost/phpinfo/, than somthing went wrong while following the instructions and your browser has interpreted this as a search. Try following the instruction again. If it still doesn't work, send me an email via my contact page and let me know somthing isn't working right. If it did work, you have successfully installed PHP.

MySQL Change root Password

ow do I change MySQL root password under Linux, FreeBSD, OpenBSD and UNIX-like like operating system over the ssh session?

Setting up MySQL password is one of the essential tasks. By default, root user is MySQL admin account user. Please note that the Linux or UNIX root account for your operating system and MySQL root user accounts are different. They are separate, and nothing to do with each other. Sometime you may remove Mysql root account and setup admin user as super user for security purpose.
Tutorial details
DifficultyIntermediate (rss)
Root privilegesNo
Requirementsmysqladmin/mysql
Estimated completion time5 minutes

Method #1: Use mysqladmin command to change root password

If you have never set a root password for MySQL server, the server does not require a password at all for connecting as root. To setup root password for first time, use mysqladmin command at shell prompt as follows:
$ mysqladmin -u root password NEWPASSWORD
However, if you want to change (or update) a root password, then you need to use the following command:
$ mysqladmin -u root -p'oldpassword' password newpass
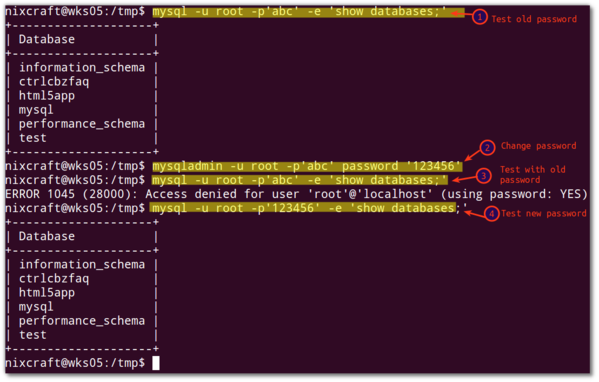
For example, If the old password is abc, you can set the new password to 123456, enter:
$ mysqladmin -u root -p'abc' password '123456'
Note:123456 password is used for demonstration purpose only. You must select a strong password. It is an important protection to help you have safer MySQL database transactions.

Sample live session from my home server using mysqladmin

Fig.01: mysqladmin command in action

How do I verify that the new password is working or not?

Use the following mysql command:
mysql -u root -p'123456' db-name-here
OR
mysql -u root -p'123456' -e 'show databases;'

A note about changing MySQL password for other users

To change a normal user password you need to type the following command. In this example, change the password for nixcraft mysql user:
$ mysqladmin -u nixcraft -p'old-password' password new-password

Method #2: Changing MySQL root user password using mysql command

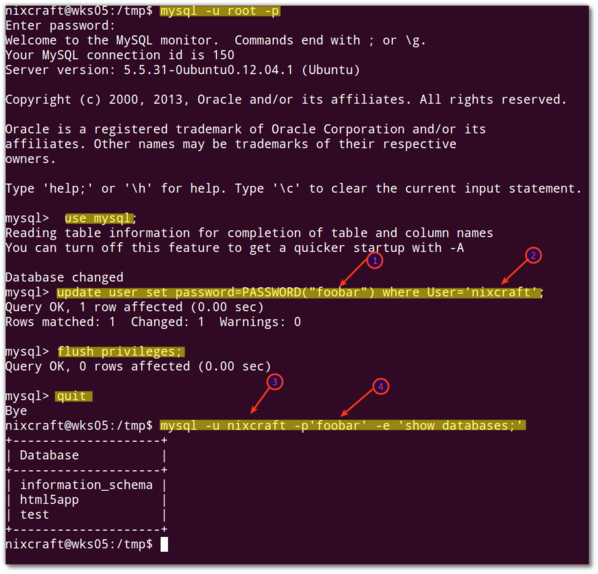
This is an another method. MySQL stores username and passwords in user table inside MySQL database. You can directly update or change the password using the following method for user called nixcraft:

Login to mysql server, type the following command at shell prompt:
$ mysql -u root -p

Use mysql database (type command at mysql> prompt):

mysql> use mysql;

Change password for user nixcraft, enter:

mysql> update user set password=PASSWORD("NEWPASSWORD") where User='nixcraft';

Finally, reload the privileges:

mysql> flush privileges;
mysql> quit

Sample live session from my home server

Fig.02: Changing mysql password for nixcraft user using sql commands.

This method is also useful with PHP, Python, or Perl scripting APIs.
See also:

ANOTHERVersion


This documentation was written for MySQL 5.0.45 but may be usefull with other versions.

How to install MySQL

  1. Install MySQL
    yum install mysql-server mysql php-mysql

How to configure MySQL

  1. Set the MySQL service to start on boot
    chkconfig --levels 235 mysqld on
  2. Start the MySQL service
    service mysqld start
  3. Log into MySQL
    mysql -u root
  4. Set the root user password for all local domains
    SET PASSWORD FOR 'root'@'localhost' = PASSWORD('new-password');
    SET PASSWORD FOR 'root'@'localhost.localdomain' = PASSWORD('new-password');
    SET PASSWORD FOR 'root'@'127.0.0.1' = PASSWORD('new-password');
  5. Drop the Any user
    DROP USER ''@'localhost';DROP USER ''@'localhost.localdomain';
  6. Exit MySQL
    exit